
Updated On 3/1/21
Wondering how to set up your Medical ID or ICE Contact on your new #AppleWatch?
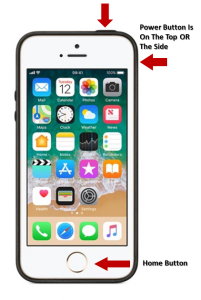
As long as you have your iPhone handy, it couldn’t be easier. One of the best things about the Apple Watch is that whatever information you put on your iPhone syncs up perfectly with your watch. Which is great news when you’re setting up your ICE Contact and Medical ID. There’s nothing worse than trying to type on a tiny little screen, right? If you’ve already set up your ICE Contacts and Medical ID on your iPhone, you’re already set. All you or a hospital has to do is press and hold the side button on your watch.
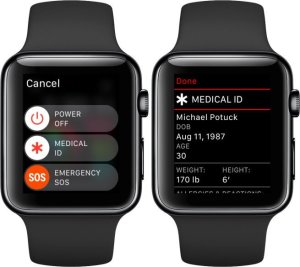
The Medical ID slide button will appear. Just tap it and you’ll see your Medical ID information. Scroll down to emergency contacts, to view any ICE Contacts you added to the Medical ID on your iPhone.
If you happen to be a medical professional or a first responder, this is a great way to find an unconscious patient’s medical and emergency information.
But what if you haven’t set up your ICE Contacts and Medical ID on your iPhone yet? Not to worry! Here’s how to do it the RIGHT way, in just a few minutes.
How To Set Up Your ICE Contacts and Medical ID On Your iPhone
As much as we love Apple’s Medical ID, there are two reasons you still need to make a regular ICE Contact, to use along with it.
Number 1: You can put an unlimited amount of vital information into a regular contact.
Number 2: Hospitals are used to looking for ICE Contacts rather than Medical ID and if you don’t have a regular one, they might miss it.
And with the way the world has been the last few years — from hurricanes to wildfires, tornadoes and oh yeah, COVID — having an ICE contact is an awesome way keep your family safe and connected no matter WHAT is happening around you.
Below, you’ll find everything you need not only to set up your Medical ID the RIGHT way, but the ICE Contacts that go along with it.
First grab the information you’ll need:
All of the contact info for your two (or more) emergency contacts.
-
A list of your allergies.
-
A list of your medical conditions/recent surgeries
-
The contact information for your main physician(s)
-
Any other information you would like an ER to know about you.
Grab your phone and let’s get started!

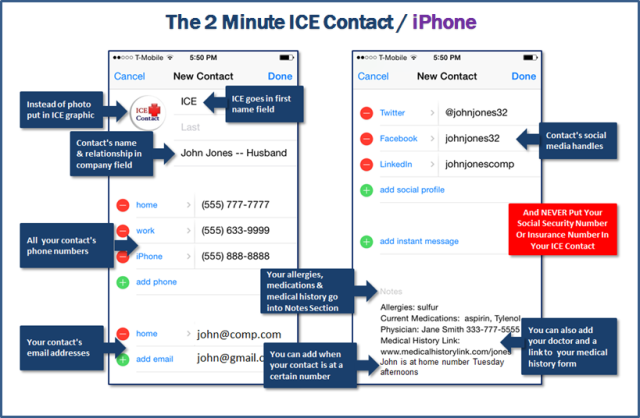
1. Put the word ICE, all capitals, in the First Name field. Don’t type anything else in this field!
2. Put your ICE Contact’s full name and relationship to you in the Company field, ie John Smith – Husband.
3. Type in every phone number you have for your contact.
4. Type in all of your contact’s email addresses — again, every last one.
5. Type in all of your contact’s social media handles/user names. You never know what will be up and running in an emergency. Many people have reached loved ones on Facebook and Twitter, when cell phone and landline service was down.
6. All of your own allergies, medications and medical history go in the notes section. Even better capitalize the words ALLERGIES, MEDICATIONS etc to ensure that they’re seen.
7. Add your physician’s names and phone numbers in the notes section and if you like, a link to your own Medical History Form. If you don’t have one, you can borrow one of ours.
8. Is your contact in different locations on different days? Add that in the notes section as well.
9. Instead of their photo, add an ICE Contact Graphic to the contact to make it stand out. Go to our Free Resource Page to find one you love.
10. And finally, never put your social security number or insurance member number into your ICE Contact. You can add the name of your insurance company and customer service number, but the actual numbers can wait until later.
And now, let’s make your ICE info even easier to find, by setting up your iPhone’s Medical ID.
Don’t forget that you can fill in your ICE Contact on your Mac or iPad. Not only is it easier to type on a larger screen, but once you save it to your contacts, it will sync with iCloud and appear right on your phone.

What Is Medical ID?
Medical ID, a part of the Apple Health App, not only gives you a place to put your emergency medical information, but it puts a link to that information right on the front of your phone, where it can be viewed by a hospital even if your phone is password locked.
You’ll find it on most iPhones (iPhone 6 and up) using iOS 8 and higher. If your phone is older and doesn’t have Medical ID, you can just leave your ICE Contact the way it is.
On your home screen click on the Health App – it’s the one with the heart on it. This will take you to the Dashboard page of the Health App. On the bottom right of the screen, you’ll see the Medical ID icon. Click on it.
On the Medical ID screen, click on the red link that says Create Medical ID.

The most important part of the Medical ID screen is at the top. It’s the On/Off Switch that shows a link to your emergency information on the home screen of your phone even when it’s password-locked.
Before you do anything else, switch this to the ON position. It will turn green like the graphic below.
By the way, none of the information in your Medical ID is shared with any of the other apps on your phone.
Enter All Of Your Information
Put all the information you possibly can into your Medical ID.
As you can see it already has fields for your birth date, medical conditions, allergies, current medications and other information. There are two sections that you need to pay special attention to – Medical Notes and Add Emergency Contact.

After you finish filling in the regular fields, use the Notes Section to list anything that didn’t fit into them, like the names and phone numbers of your physicians and healthcare providers and contact information for your Insurance Company. Again, don’t add any sensitive personal information like a social security number, insurance member ID number or financial information.
You can also place a link to your Medical History Form in the Notes Section to give emergency personnel to quick access to your medical history until your emergency contact arrives at the hospital.
Add Your Emergency Contact
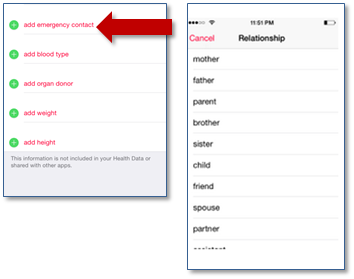
When you click on Medical ID’s Add Emergency Contact button, it will show you a list of your contacts, so you can choose the people you’d like to add to your Medical ID. That’s why we had you set up your ICE Contacts first.
Go ahead and click on the button and choose your first ICE Contact.
If you have additional ICE Contacts (a smart idea, in case your first contact is unreachable), then click on the Add Emergency Contact field again to add as many additional people as you would like.
Want to save time turning your husband or wife’s contact into an ICE Contact? Simple! Just tap & hold the contact you want to use, choose share and email it to yourself. Then open it in your email, make the changes from above to turn it into an ICE Contact and save it to your contacts as ICE.
That’s all there is to it!
While you’re here, be sure to check out our other posts like How To Put An ICE Contact On Your Samsung Galaxy, Android or Window’s Phone (you’ll find the links below), to learn EVERYTHING you need to know about ICEing nearly any type of phone.
And don’t forget to put ICE Contacts on your spouse’s and kid’s phones too, along with each other’s contact information, so you can get in touch with each other quickly and easily.
Having an ICE contact and Medical ID is an awesome way keep your family safe and connected no matter WHAT is happening around you.
Have Fun Getting Your Stuff Together!

The ICE My Phone Kit
 Did you know your smartphone can save your life? It can also save your spouse’s life, your kid’s lives and the lives of everyone you love! The secret is letting your phone do the talking for you in an emergency. How? With ICE, your in case of emergency contact. In “The ICE My Phone Kit” you’ll find step by step directions for ICEing, iPhones, Galaxies, regular Androids, Windows and even flip phones. Paperback Or Instant Download
At Your Fingertips | Make Your Smartphone Even Smarter
 What if I told you, there was something you have with you right now, that can give you the support, information & ability you need to keep everyone and everything you love safe and sound, PLUS the power to gather your family in seconds no matter where they are. What is it? It’s your smartphone! At Your Fingertips is an easy to read, easy to use guide that turns your smartphone into your very own life preserver. Paperback Or Instant Download


